Install
One script puts the autonom command line on your PATH and gives your agent its skills. Then autonom doctor says what works on this machine and how to fix the rest.
Try it git clone https://github.com/aiatsuk/autonom
How it works
Four steps in a terminal. You need git, Python 3.11 or later and Node 20.11 or later.
- Get the code.
Clone the repository and step into it.
git clone https://github.com/aiatsuk/autonomcd autonom - Install it.
A checklist asks which device tools to add. Tick your agents too, and each one gets the skills.
./install.sh - Ask what this machine can do.
Green means installed, not proven. Anything missing comes with the exact fix.
autonom doctor - Take the tour.
Start a new agent session so it loads the skills. Then take the guided walk on your device.
autonom tour
Or, without cloning. Claude Code and Codex can add the skills as a plugin. Start a new session afterwards so it loads. In Claude Code:
claude plugin marketplace add aiatsuk/autonom
claude plugin install autonom@autonom
In Codex:
codex plugin marketplace add aiatsuk/autonom
codex plugin add autonom@autonom
Autonom comes in three layers, and only the first is required. The command line is always installed. Device tools and agent skills are checkboxes you pick.
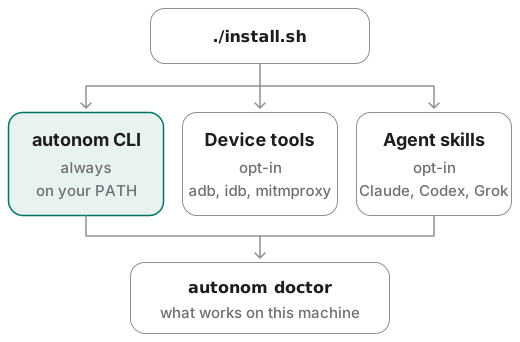
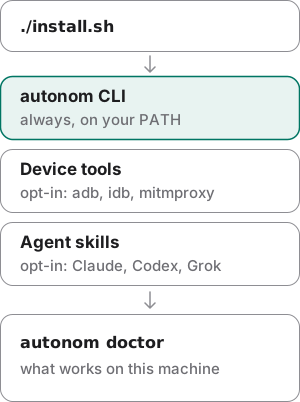
On a terminal, the script preselects what the machine can plausibly use, such as a claude or codex command line it finds. Without a terminal it never prompts: no flags means the command line only.
The command line is one Python script that uses only the standard library. The installer links it into ~/.local/bin, so there is no virtualenv, no pip and no build step.
Skills install per agent: Claude Code and Codex through their plugin marketplaces, Grok and any other agent through a skills folder. Each device tool is found at run time and unlocks one capability, so you can add it later.
Examples
Install for one agent without the checklist
Goal: the command line, the device tools and the skills for Claude Code in one pass, with no questions.
- Name what you want.
It fetches adb, mitmproxy and idb through brew, pipx or apt-get, then adds the skills.
./install.sh --tools --claude - Start a new agent session.
Claude Code loads plugins when a session starts.
- Check the command line.
It answers in JSON, like every Autonom command.
autonom version
You should see the name and the version you installed.
What to look at. Any answer means autonom is on your PATH. If the shell cannot find it, add ~/.local/bin to your PATH: the installer prints the line to add.
Find out what this machine can do
Goal: know which platforms work before your agent picks a target.
- Ask the doctor.
Each capability says whether it is ready and what it needs.
autonom doctor - Gate a pipeline on it.
Strict mode exits 1 when something is missing.
autonom doctor --strict
You should see one entry per capability, each with ready and what it needs.
What to look at. ios_hid is not ready on this Mac, which runs Xcode 27 with an older idb companion. axe_ready is true, so taps still work through AXe, as the next example shows.
Fix taps on Xcode 27
Goal: the screen reads, but every tap, swipe and typed string fails with ios_hid_framework_missing; make input work again.
Xcode 27 moved SimulatorKit, and an idb companion built before that still looks in the old place. Upgrade the companion, or install AXe.
- Confirm the cause.
The doctor shows
ios_hidnot ready next to a workingios_tree.autonom doctor - Trust the companion's formula.
Homebrew refuses the companion from an untrusted tap, and its error names neither the tap nor the fix.
brew trust --formula facebook/fb/idb-companion - Upgrade the companion.
A current build finds SimulatorKit where Xcode 27 put it.
brew update && brew upgrade idb-companion - Upgrade its client.
The idb client and the companion move together.
pipx upgrade fb-idb - Or install AXe instead.
It drives the Simulator's input on its own, whatever the companion's age.
brew install cameroncooke/axe/axe - Run the doctor again.
It names the backend input now uses.
You should see the input backend, and each prerequisite with its fix.
What to look at. hid_backend is axe: the screen is still read through idb, and input goes through AXe. This Mac took the AXe route, so idb_companion_hid still names the upgrade.
Take the tour
Goal: see what Autonom has and the walk it offers on this machine.
- Read the overview.
In a terminal it first prints the overview as text and offers the walk; your agent gets JSON.
autonom tour - Walk it on a device.
It walks three screens into Settings and writes an HTML report, as Your first check shows.
autonom tour --run
You should see the overview, and the walk proposed for a running emulator.
What to look at. run_command is the exact walk the tour offers, on the emulator it found running.
Reproduce these outputs
The version and tour outputs come from Autonom's fake devices, run as below from the root of an Autonom d0f7211 checkout in bash or zsh. The doctor reports the tools of the machine it runs on, so its outputs above are examples from one Mac.
Good to know
- Green means installed, not proven. The doctor reports what is on the machine. Only a real run on a target proves a capability works.
- The doctor exits 0 even when tools are missing. A diagnostic that fails is useless in a pipeline. Pass
--strictwhen a missing tool should fail the job. - fb-idb breaks on Python 3.14. Every idb call then dies with “There is no current event loop”. Reinstall it on an older interpreter:
pipx reinstall fb-idb --python /opt/homebrew/opt/python@3.12/bin/python3.12 - A path override can hide a tool. The doctor lists every active
AUTONOM_*override and warns withoverride_path_missingwhen one points at a binary that does not exist. - Claude Code runs a cached copy of the plugin. After the source changes, update it, then start a new session:
claude plugin update autonom@autonom - Nothing lands in your project. Sessions live in
~/.autonom/sessions/, app memory in~/.autonom/apps/, and machine state in~/.local/state/autonom/. SetAUTONOM_HOMEto move all of it under one root. - Session folders are sensitive. They can hold screenshots, logs and captured traffic. Delete them when an investigation ends.
Reference
| Command | What it does |
|---|---|
./install.sh | Opens a checklist of device tools, Claude, Codex and Grok. The command line is always installed. |
./install.sh --all | Installs everything without asking. |
./install.sh --tools --claude | Installs any subset. Names such as claude codex work too. |
./install.sh --cli-only | Installs only the autonom command line. |
autonom version | Prints the installed version. |
autonom doctor | Reports tools, capabilities, leftover processes and active overrides. |
autonom doctor --strict | The same, and exits 1 when something is missing. |
autonom tour | Shows what Autonom has, the usual workflow and this machine's targets. |
autonom tour --run | Walks three screens into Settings and writes an HTML report. |
Advanced options
| Command | What it does |
|---|---|
./install.sh --link ~/.my-agent/skills | Also links the skills into any skill folder. --copy makes a snapshot instead. |
./install.sh --prefix /opt/autonom | Sets the bundle home, ~/.local/share/autonom by default. |
./scripts/install_cli.sh | Links only autonom into ~/.local/bin. --copy writes a launcher script instead. |
./scripts/install_skills.sh grok | Installs the skills for Grok. |
./scripts/install_skills.sh --link /path/to/agent/skills | Links the skills into any agent that loads a folder of SKILL.md files. |
./scripts/run_checks.sh | Runs Autonom's own checks. They need no Flutter, Android SDK, Xcode, idb or mitmproxy. |
Android and iOS differences
What each platform needs before your agent can use it.
| To use | Android | iOS Simulator |
|---|---|---|
| Session, screenshot, logs, deep links | adb from platform-tools | Xcode |
| Accessibility tree | adb | idb and its companion |
| Tap, swipe, type, keys | adb | idb, or AXe on Xcode 27 |
| Network capture | mitmproxy | mitmproxy |
iOS targets need a Mac with Xcode. An iOS target on another Mac is reachable through its idb companion. The Android SDK and Flutter are needed only when a domain skill works on a real project.
Next steps
Autonom is installed, and the doctor says what works on this machine.